Hướng Dẫn Kết Nối WiFi Hệ Điều Hành Windows 7

Sinh viên kết nối WiFi trên hệ điều hành Windows 7 có thể thực hiện theo các bước sau:
Students follows steps below to connect WiFi on OS Windows 7:
Bước 1: Vào “Control Panel”, chọn mục “Network and Internet”/ Go to “Control Panel” and “Network and Internet”
.png)
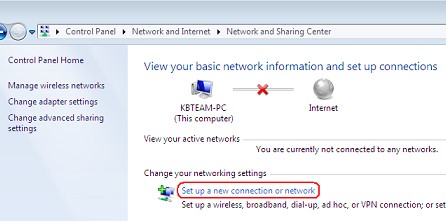
Bước 2: Vào mục “Network and Sharing Center” và chọn mục “Setup a new connection or network”.
Go to “Network and Sharing Center” and “Setup a new connection or network”.

Bước 3: Vào mục “Manually connect to a wireless network”. / Go to “Manually connect to a wireless network”.
.png)
Trong khung "Network name", điền tên WiFi cần kết nối, vd: FPTU_Students; FPTU_Exam,... Mục “Security Type” chọn “WPA2-Enterprise”, chọn "Next".
Fill the name of WiFi which's wanted to connect to "Network name" . For example: FPTU_Students; FPTU_Exam,... Chosse “WPA2-Enterprise” on tab “Security Type”

Tại khung “Network Properties”, chon tab “Security” và chon “Setting”. / On “Network Properties”, go to tab “Security” and “Setting”
.png)
Tại khung “Protected EAP Properties”, bọ chọn tab "Validate server certificate", sau đó chọn “Configure”
On “Protected EAP Properties”, unclick "Validate server certificate" and choose “Configure”.

.jpg)
Trở lại khung “Network Properties”, chọn “Advances Settings”, chọn “Specify authentication mode” và chọn mode “user authentication” và “Save Credentials”.
On“Network Properties”, go to “Advances Settings”, choose “Specify authentication mode” and “user authentication”, “Save Credentials”

Trong khung “Save Credentials”, nhập tài khoản WiFi của sinh viên. On “Save Credentials”, fill the WiFi account of students

Chọn “OK” ở tất cả các khung còn lại.
Bước 4: Kiểm tra, sinh viên nhấn vào icon “WiFi” và chọn Wifi cần kết nối.
Check on the WiFi icon.
.png)
Video Hướng Dẫn Kết Nối WiFi Trên Thiết Bị Hệ Điều Hành Windows 7 tại Campus HCM: link


